One of the most frequently asked questions from Branch clients is, “How do I test if I’ve set up the Branch SDK correctly?” After setting up the Branch SDK in an app, it makes sense that clients would (and should) test it out to ensure everything is configured properly before releasing the app and running campaigns with Branch links. This blog post provides step-by-step instructions to effectively QA your Branch mobile SDK integration and shares best practices and pro tips for doing so.
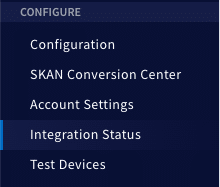
Step 1: Check the Integration Status tab
The Integration Status tab in your Branch Dashboard is the first place you’ll want to look for the overall status of a Branch integration. When you log in to the Branch Dashboard, you’ll find the Integration Status tab on the left sidebar underneath the Configure section:
Here, you’ll find a high-level overview of your Branch integration progress. The top of the page shows a Setup Progress score, which is the overall indication of your progress. If you are at 100%, you can skip to step two. Otherwise, keep reading to track down the remaining steps.
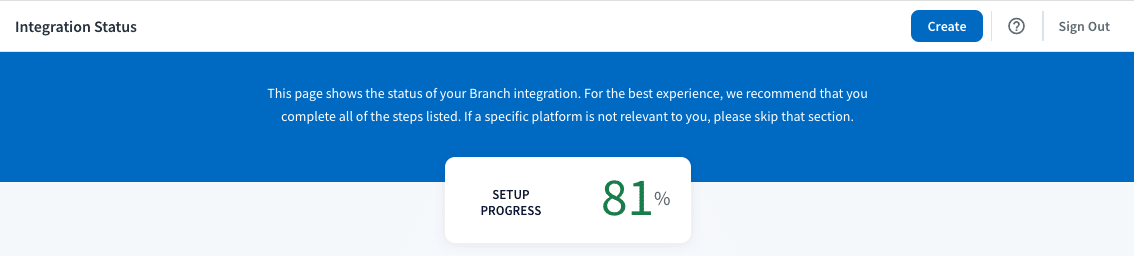
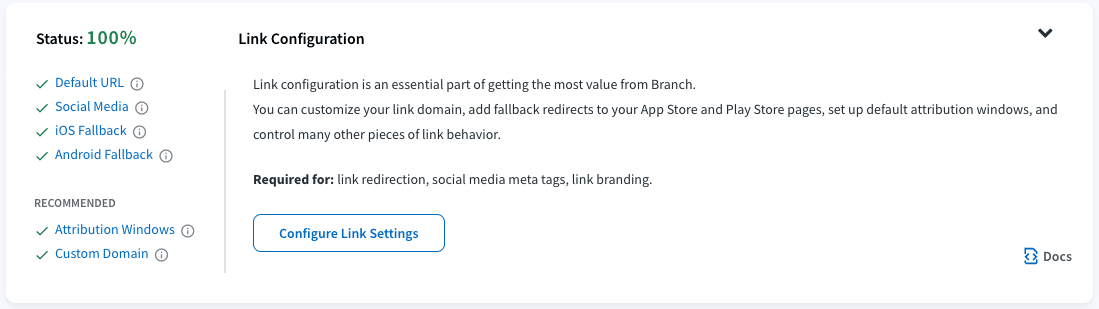
This Setup Progress score breaks down into four subsections: Android SDK, iOS SDK, Web SDK, and Link Configuration. Each of these subcategories has a status, completion percentage, as well as a list of completed and remaining steps.
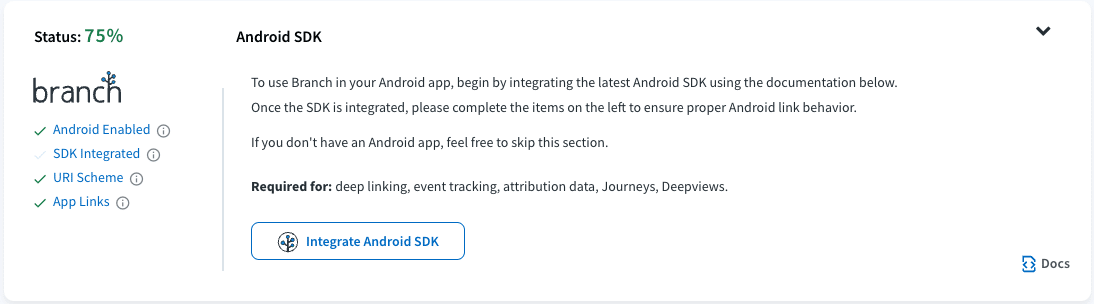
Incomplete steps are marked with a grayed-out check, while completed steps have a green check. You’ll want to ensure that each of the steps in all four subsections has a green check to reflect 100% completion.
While the Integration Status tab is a good first indicator of your progress, it is not the most comprehensive. Once all items on the page show 100% completion, or if you are unsure what else you need to do to complete a specific item, use Branch’s Integration Validator tool to get a more detailed look.
Step 2: Utilize Branch’s Integration Validator
The Branch SDK has an automated testing tool that you can use to check the status of the integration and get detailed information about any misconfigurations or incomplete steps. To utilize the Integration Validator, simply add a line of code to your project, then run the app on an emulator or device. The line of code that you add will depend on which tech stack you are using for your project:
- Android: IntegrationValidator.validate(this) in Kotlin or IntegrationValidator.validate(MainActivity.this); in Java. More information here.
- iOS: Branch.getInstance().validateSDKIntegration() in Swift or [[Branch getInstance] validateSDKIntegration]; in Objective-C. More information here.
- Flutter: FlutterBranchSdk.validateSDKIntegration(); More information here.
- For other cross-platform tech stacks, like React Native, use the Native Android & iOS steps at the native level of the project.
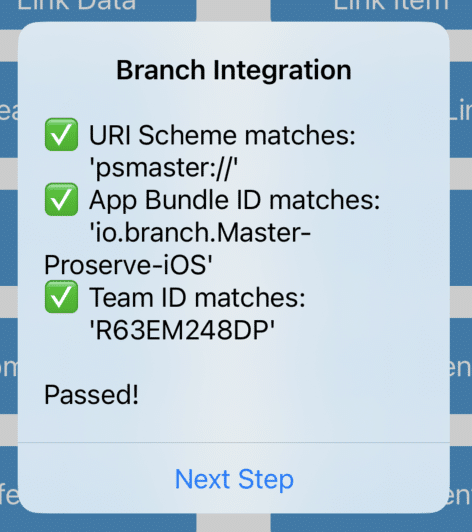
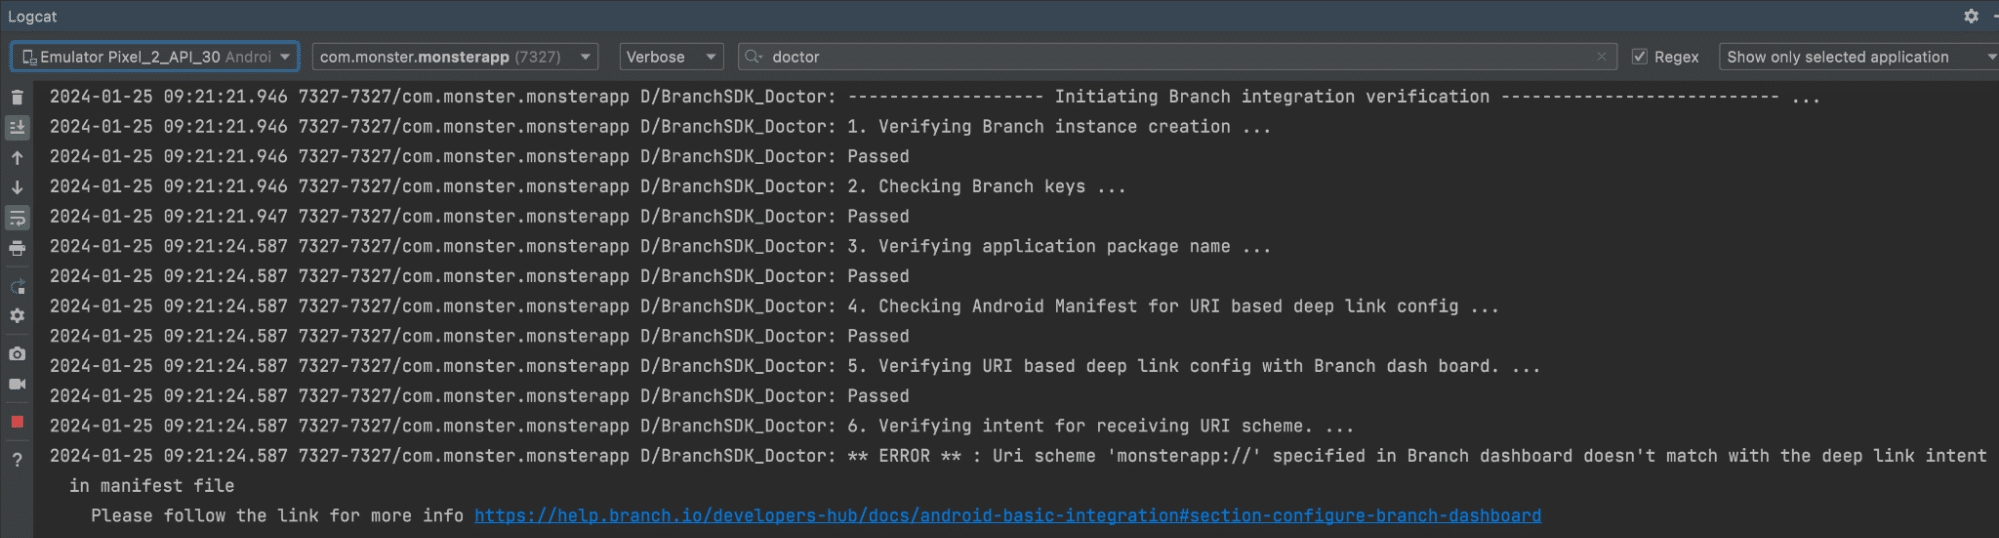
The Integration Validator will check to ensure that the Branch keys, package name, URI schemes, Android App Links, Universal Links, and link domain settings from the Dashboard match those in the build. If there is a mismatch, it will likely cause unexpected behavior or a broken SDK experience, and you will be able to see what is wrong and how to fix it in the tool’s output. On iOS, the Integration Validator provides feedback in the form of a popup and XCode logs.

On Android, this information is output to the logcat in Android Studio.
If all of the checks pass, you have successfully completed the integration on the Branch Dashboard as well as at the code level.

If something is still amiss, check the responses coming back from the Branch server to ensure that the server is sending the app the expected information.
Step 3: Enable logging to check the responses from Branch
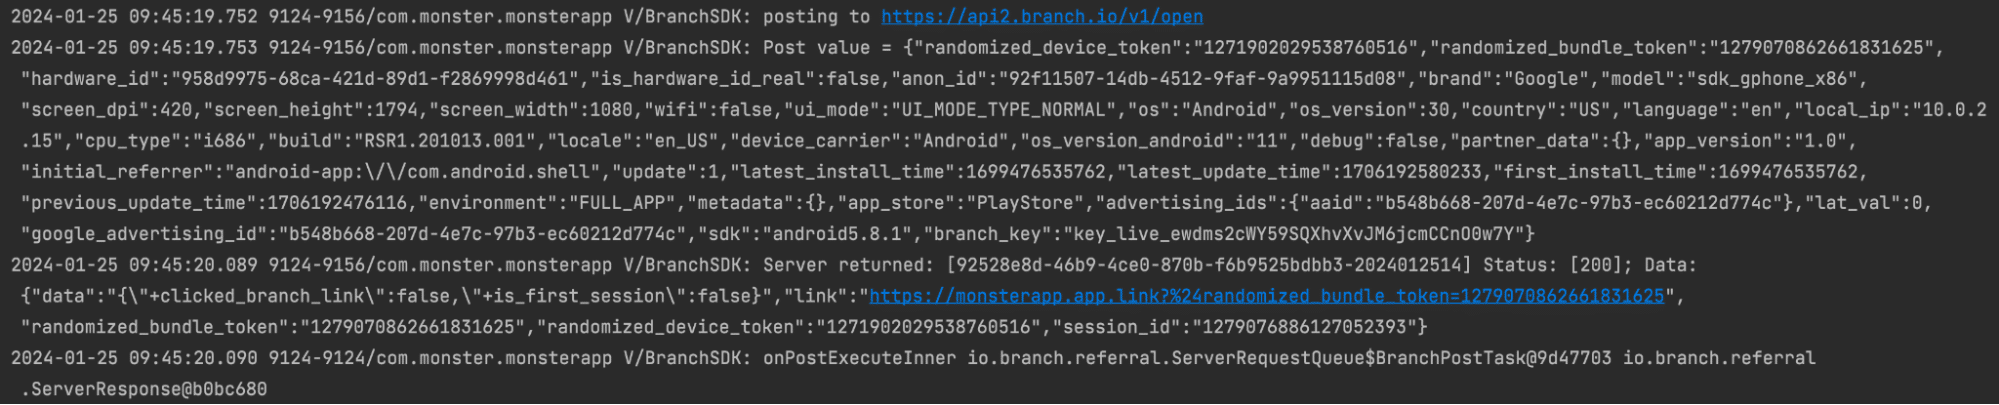
To see the requests sent to and from the Branch server, each of Branch’s SDKs features code that enables network logs to be output to the console. The line of code you add will depend on which tech stack you are using for your project:
- Android: Branch.enableLogging() in Kotlin or Branch.enableLogging(); in Java.
- iOS: Branch.getInstance().enableLogging() in Swift or [[Branch getInstance] enableLogging]; in Objective-C.
- React Native: RNBranchModule.enableLogging();
- For other cross-platform tech stacks, like Flutter, use the Native Android & iOS steps at the native level of the project.
Once you add the code, you’ll see the endpoint, request, and response for each in-app event.
Once everything checks out, the next place to continue investigating anomalous behavior is the link debugger.
Step 4: Analyze expected behavior with Link Debugger
Whereas the previous steps ensured proper configuration for your app, the next step is to check the configuration of the link you are using to test. Sometimes, the link itself can be the culprit if it does not have the proper configurations and link data added when it’s created. To check, use Branch’s Link Debugger.
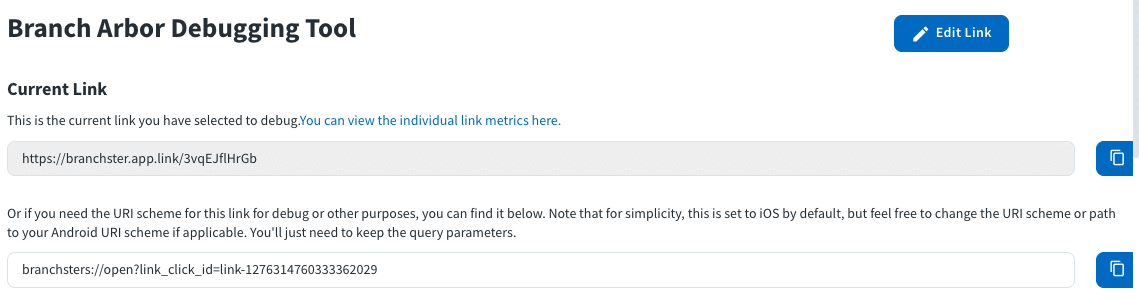
First, ensure that you are signed into your Branch Dashboard and in the proper environment (live or test) for the link you want to check. Copy the Branch link and then add ?debug=1 on the end. For example, if my Branch link is https://branchster.app.link/3vqEJflHrGb, it would become https://branchster.app.link/3vqEJflHrGb?debug=1. Pasting the Branch link and suffix into the browser will open up the Link Debugger view:
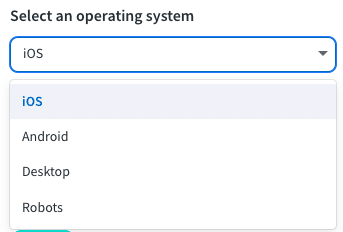
One of the most helpful features on this screen is Link Routing Debugger, which allows you to view the expected behavior for each operating system and click location. To start, select an operating system using the dropdown menu.
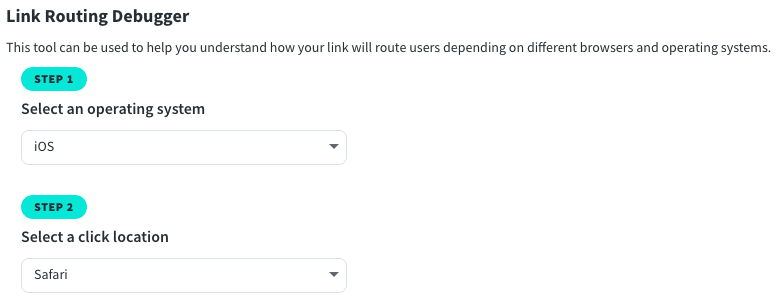
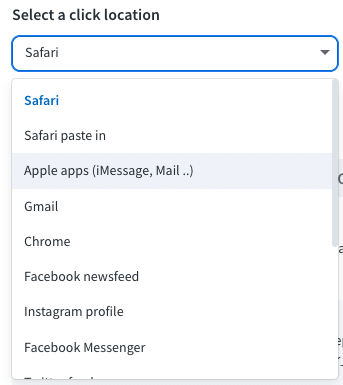
Next, select a click location using the dropdown menu. This will reveal a myriad of options to choose from.
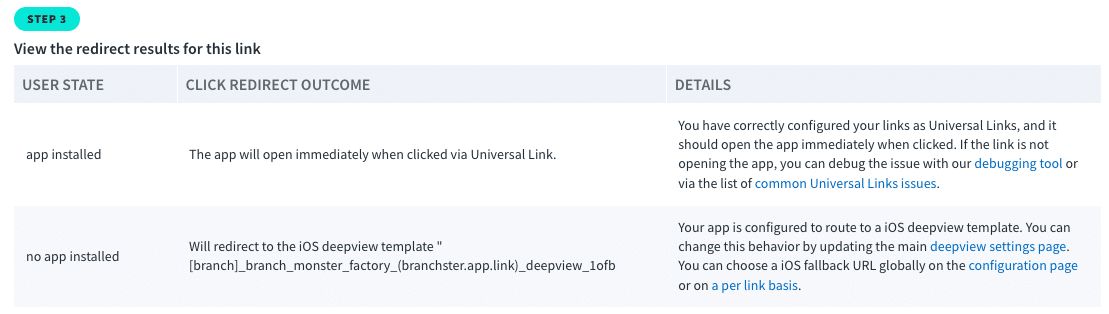
Based on the operating system and click location you have selected, you’ll see the click redirect outcome for when a user does and does not have the app installed. For example, this Branch link clicked on an iOS device on Safari would open the app for users who have it, and users who do not have the app will be redirected to the iOS Deepview template configured in the Branch Dashboard.
The Details column to the right shows additional information about why that click redirect outcome would occur based on the current configurations of the link and the SDK setup for the app.
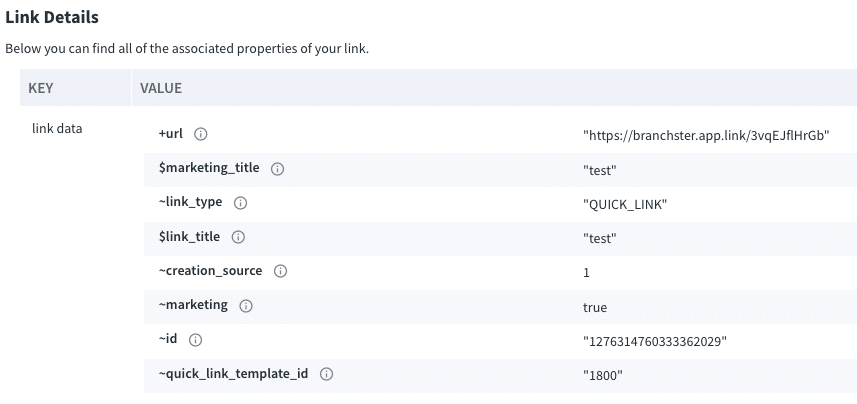
Finally, the Link Details section will show you all of the properties associated with your link –– aka the link data. If you are ever wondering if a link was configured with the correct data, this screen is a great place to check to see if the expected data is there and if it contains the correct value.
While this step provides an understanding of how the link will behave in different scenarios across operating systems and platforms, you’ll still want to test the Branch link on your device.
Step 5: Test the behavior of a Branch Link on device
The best way to test your SDK setup and link configurations is to test a Branch link on your device. To do so, add your device to the Test Devices section of the Branch Dashboard. This will allow you to reset the device ID to simulate a first-time user flow and mark any data during the sessions as test data so that it doesn’t muddle your production metrics. In general, it is best to check the following use cases at a minimum when you are preparing to launch your Branch integration:
- Remove the app from your device and reset your advertising ID. Click the Branch link, then load the app with the Branch SDK. After you complete onboarding, ensure that you were routed to the correct screen in the app.
- With the app installed, click the Branch link. Ensure that the app opens when the link is clicked and that you are routed to the correct screen based on the link data and deep link routing logic coded into the app.
By using the steps detailed in this blog post, you’ll be able to thoroughly test out your Branch integration and validate that users who click on Branch links from different scenarios experience a great UX.
Have questions? Reach out to your account team.
Want to learn more about getting started with Branch? Request a demo!