
Integrating Branch into your app has never been easier, thanks to our revamped documentation. If you’re pressed for time or would just rather have a simple plugin to do it for you, we’ve got the answer! We’re excited to introduce you to Branch’s latest CLI tool, branch_io_cli. This tool was written and is maintained by our rockstar engineer Jimmy Dee.
Our main goal for building this new tool was simple: Help our partners integrate the Branch SDK quickly and automatically while eliminating the possibility of human error.
Here’s a step-by-step tutorial for using this tool, along with highlights of some of the features. Fasten your seatbelts, and follow along on your favorite iOS Project.
Use CLI to Integrate Branch into a Sample iOS App Built in Swift
Prerequisites:
1. Ensure that you’ve setup your Branch Dashboard using the instructions here, and have your Branch Key and Branch link domain handy.
2. An iOS project with which you’d like to integrate Branch.
Instructions:
Install the Branch CLI
- From terminal, cd into your iOS app’s project directory (the one that includes the xcodeproj file).
- Type gem install branch_io_cli into terminal.
*If you get an error saying that you don’t have permissions to perform this operation, try installing with sudo.
Install the Branch SDK into your app:
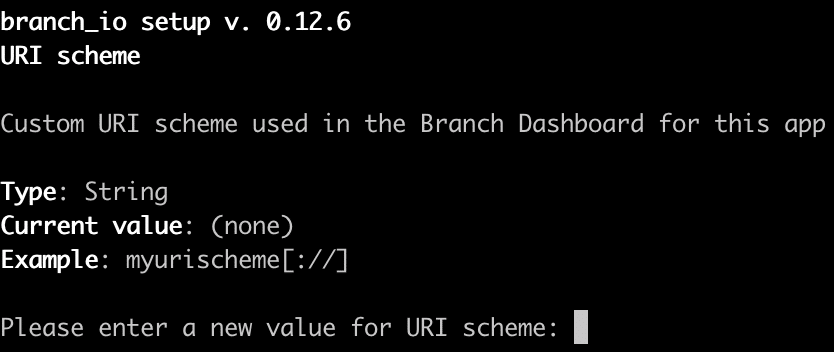
1. Type br setup into terminal, and you’ll be greeted with a few options on the following screen:
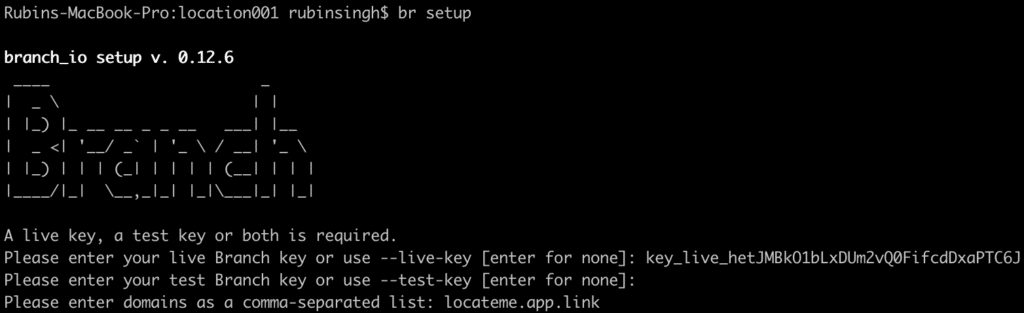
- Fill out your Branch Key from Account, and your app’s link domain information from your Link Settings pages.Note: You don’t need to add your -alternate.app.link domain. The CLI will take care of that for you.
- Once complete, you’ll see the following set of instructions:
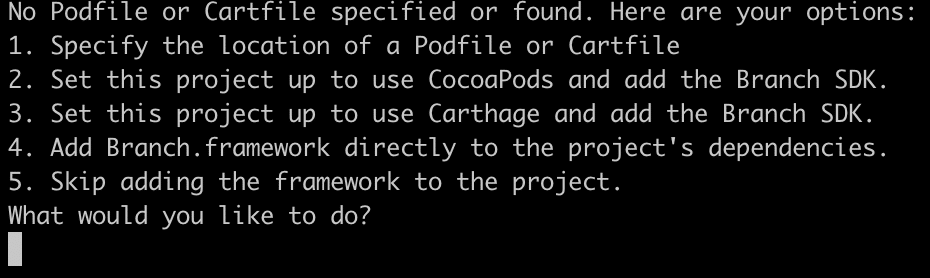
4. The app with which I’m integrating does not have any third party SDKs integrated, so I’m going to pick option 2: Set this project up to use CocoaPods and add the Branch SDK.5. Before modifying your project, the CLI will confirm your inputs. If something is entered incorrectly, you’ll have the option to return and change your values: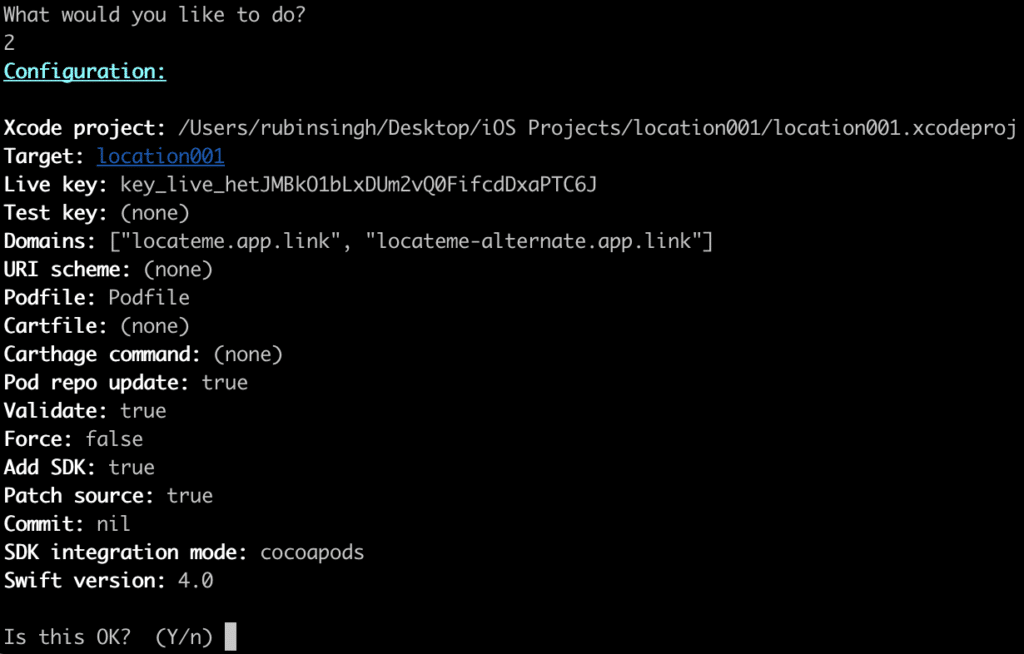
6. To show you what that looks like, I’ll make changes to my URI scheme so I’m going to enter N to the prompt.7. To insert my app’s URI scheme, I’ll enter 4 into the prompt:
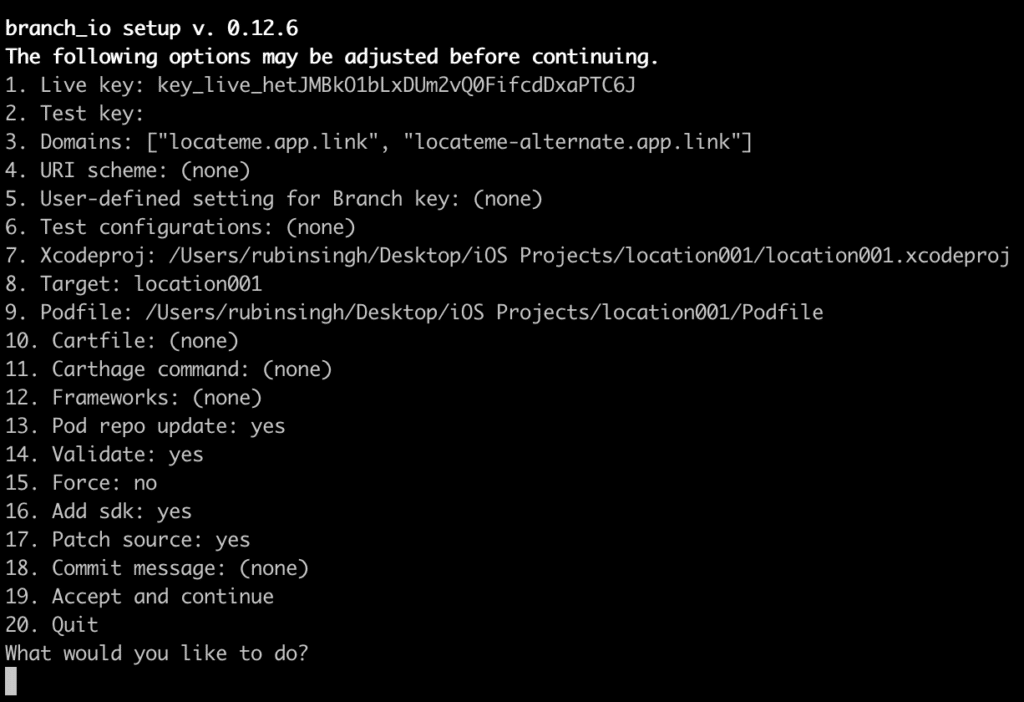
- After entering a URI scheme, I chose option 19: Accept and Continue, which starts the Universal Link validation process:
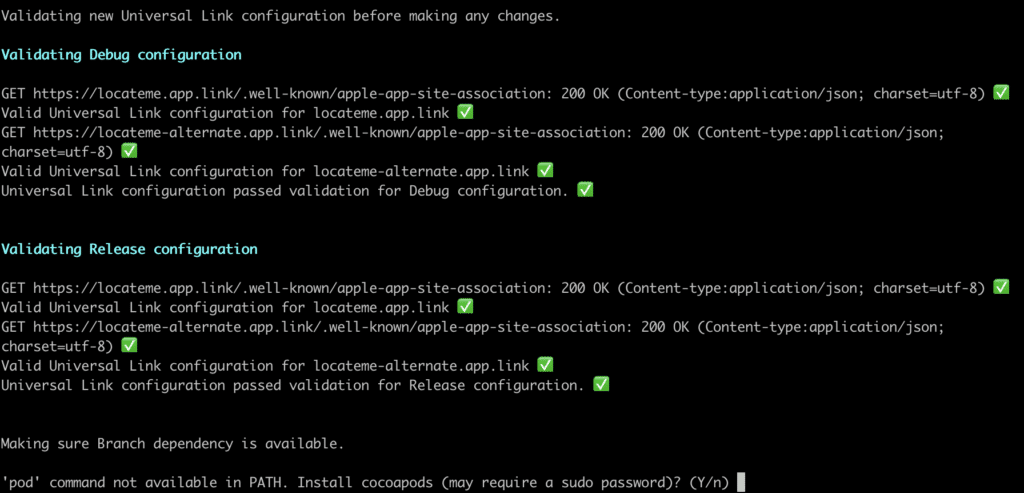
According to the tool’s output, locateme.app.link and locateme-alternate.app.link are found in the AASA file, so the rest of the process continues as expected.
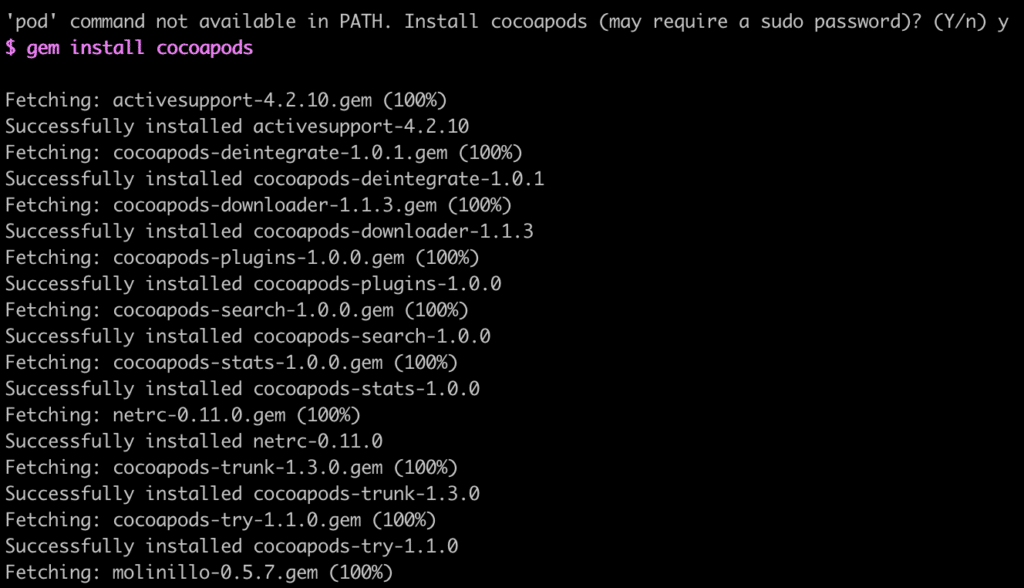
- Next, the CLI intelligently detects that the ‘pod’ command is not available, so it installs cocoapods for me:
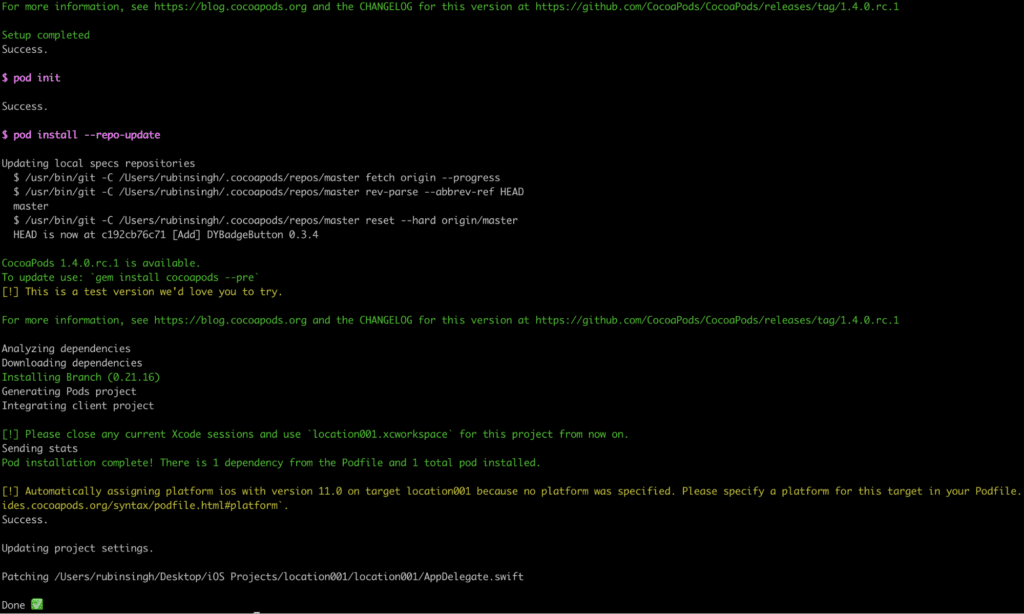
- After installing cocoapods, the CLI installs the Branch plugin and injects values for my app and various snippets into my project.
Verification
Now that we’ve successfully completed the integration, let’s verify the setup end to end.
1. First, let’s verify that the podfile is correctly set up. In your project’s directory, you’ll need to look for a file called Podfile. Once you’ve found it, open it in your text editor.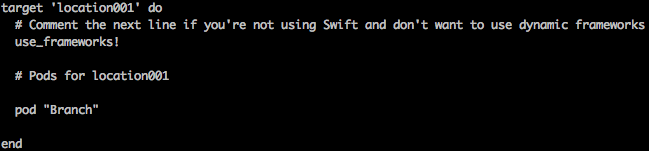
✅
2. Next, let’s open our project’s .xcworkspace to ensure that the plugin installed correctly. Under the Pods project, expand the Branch folder—you should see a list of files that are related to the SDK.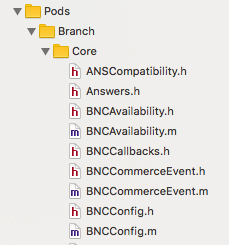 ✅
✅
You’ll also notice that the CLI tool added the AdSupport.framework, since it’s required for IDFA collection:
3. Next, let’s verify that our URI scheme and Branch Key are present in our info.plist file. Look for a property called URL Schemes under Item 0 for the URI scheme. It might be in a different Item location if your app is already registered with other URI schemes.
For the Branch Key, look for an entry called branch_key.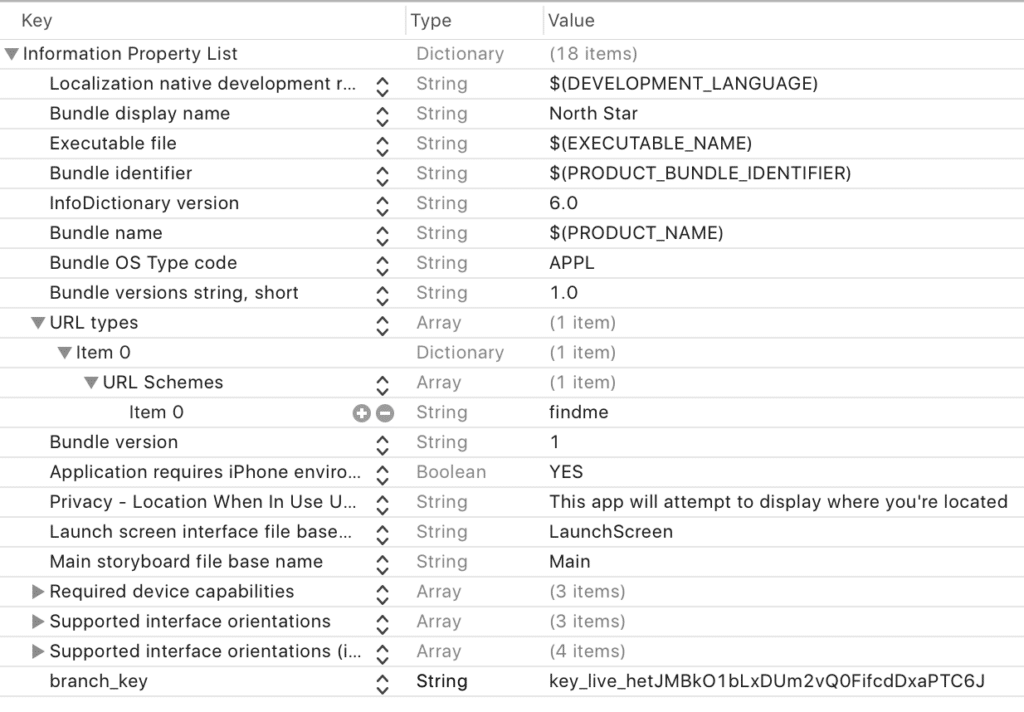 ✅
✅ - Moving right along, let’s verify that the tool integrated Branch correctly in the following AppDelegate methods:application(_ application: UIApplication, didFinishLaunchingWithOptions launchOptions: [UIApplicationLaunchOptionsKey: Any]?)application(_ application: UIApplication, continue userActivity: NSUserActivity, restorationHandler: @escaping ([Any]?) -> Void)
application(_ app: UIApplication, open url: URL, options: [UIApplicationOpenURLOptionsKey : Any] = [:])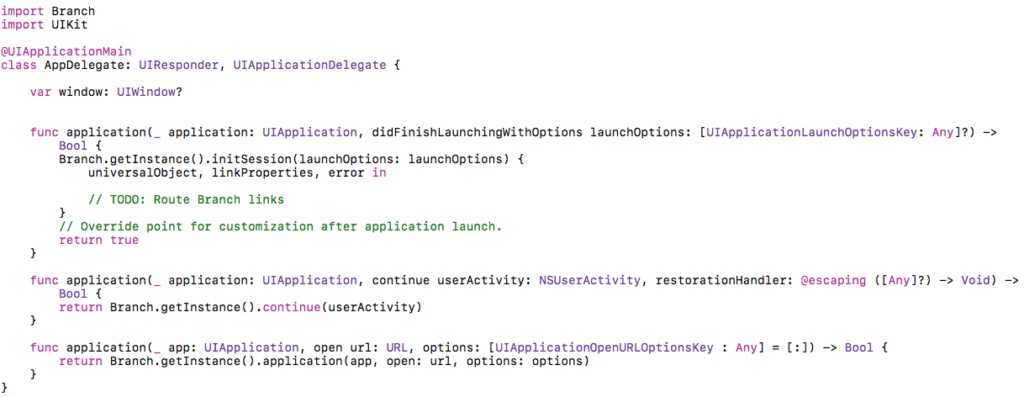
✅Note: You can extract data associated with your Branch Links by examining universalObject and linkProperties in your Branch deep link handler.4. Finally, let’s verify that our Branch link domains are correctly inserted in our entitlements file for Universal Links: ✅
✅
It all checks out! In fact, the tool may have integrated Branch into my app more quickly than it took to complete the simple verification steps!
Other Important Features
- Validation of Universal Links: The CLI ensures that your app supports Universal Links by comparing your project’s bundle identifier, team id, and domain entries in your entitlements file against what is stored in Branch’s Apple App Site Association file for your link domain.
- Support for multiple targets: To install for a specific target, use the –target flag, or use the configuration editor to change the inferred target each time. If the target in question is an extension, the tool will add the SDK, set the keys into the Info.plist, and patch source (if it’s a Messages extension, for example).
- Rake for Task Management: This gem has a rake for Task Management that is available here.
- Fastlane Plugin: There is also a Fastlane plugin available here, should you prefer to use it instead.
Go on—give this a spin, and let us know if you have any feedback. As always, we’re available at [email protected].
Disclaimer: As advancements continue to be made, the following tutorial is subject to change.