Deep linking has become more and more relevant in the mobile ecosystem as major tech players are joining the party. The benefit of deep linking are very evident, and here we’ll quickly walk through a couple points to keep in mind when designing your iOS app for deep linking. Setting up deep linking is easy. It takes no more than 5 minutes. The hard part is structuring your application to handle deep link ‘requests’ when they come in. When we first learn how to write iOS apps, Apple encourages people to start with one single view controller, usually the sign-in page or splash page, with the giant arrow they give you in the Storyboard. This makes people get stuck with the mindset that an app’s flow will start with a single page and then propagate sequentially to other scenes. This sort of mindset usually works but is dangerous if you want to do deep linking. There are two main points that will help you design your application to be more suitable for deep linking.
Keys to iOS Deep Linking
Make each view controller input/state independent.
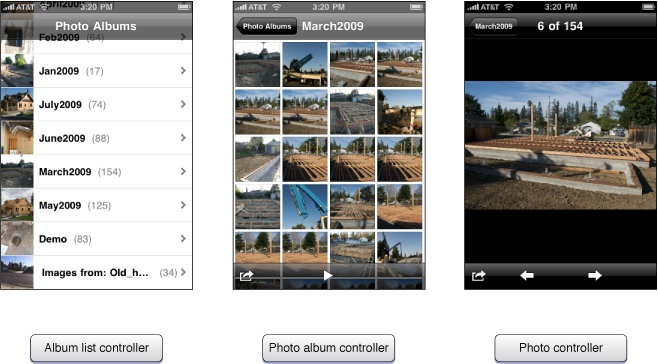
Let’s take the old Photos app on iOS as an example. The app starts with a list of albums, then a list of photos, and finally the detailed view of a photo. What we have here is a UITableViewController that segues to a UICollectionViewController then finally a UIImageViewController.

With a flow like this, it’s easy to fall into the trap where we instantiate images in the second view controller, and pass the selected image, as a variable, to the ImageViewController as shown below.
- (void)prepareForSegue:(UIStoryboardSegue *)segue sender:(id)sender {
if ([segue.identifier isEqualToString:@“Show Image”]) {
if ([segue.destinationViewController isKindOfClass:[ImageViewController class]]) {
ImageViewController *imageVC = (ImageViewController *)segue.destinationViewController;
imageVC.image = selectedImage;
}
}
}
This is OKAY for normal use cases, but suppose you want to share one specific photo to a friend with a URL link. When your friend clicks on the link and we bring up the DetailViewController, the app might break because the image variable might not have been correctly initialized. Of course, if the deep linking mechanisms are set up correctly in our app, we would be able to get the correct value from the deep link SDK. However, if there’s a network failure or the user has no internet access, the image variable will be nil which will cause some trouble.
Main Point: You need to be able to show a view directly, i.e., do not assume any state prior to instantiation.
With iOS deep linking, we send a user to a specific view controller within the application. However, if that view controller is dependent on input states that may not be properly initialized, the application will likely break since the values it’s expecting might be nil or ill-formed.
That’s why when we design our app, we need to make sure that each view controller can be instantiated directly. We also ALWAYS need to handle cases where we get unexpected values as input. It’s okay if we want to show the ImageViewController and the image variable is nil. We can handle this situation with a placeholder image that says something went wrong or redirect to other pages. We have to avoid, however, letting the app crash.
This is really important to keep in mind because as you add more features and scenes, the number of edge cases that might break your app will grow exponentially. Taking deep linking into consideration will save us a lot of debugging time.
Routing in iOS applications and use of flow controllers
When people develop web apps, the first thing they do is set up a router. I strongly believe that we should do the same for iOS applications. There are two components to adopting this paradigm. First, we need to separate the routing logic out of the view controllers. iOS allows developers to segue to other view controllers. This can lead to problems as applications get larger. When you have view controllers pushing each other onto the stack, it can be really hard to keep track of who called who which introduces a whole lot of edge cases that become a nightmare for debugging and maintaining code. In my opinion, it’s a good practice to keep the routing logic in place as detailed here.
The second component, which is somewhat optional but can make your code cleaner, is to use URL parsers such as JLRoutes or Routable. These projects are designed to bring the routing capabilities of web apps we know and love to iOS. These tools bring several benefits. One important benefit is that it allows us to avoid hard-coding which view controller we want to instantiate. It allows us to change easily which view controller each URL maps to, thus when we decide to delete/edit a view controller it becomes really convenient. Using these tools also gives you route prioritization, wildcard parameters, scheme namespaces, and all sorts of other good stuff.
Using JLRoutes allows us to show scenes like this:
NSURL *viewImagesURL = [NSURL URLWithString:@"myapp://images/view/image1"];
[[UIApplication sharedApplication] openURL:viewImagesURL];
Of course, we’ll have to add some code in the app delegate to set up the routing SDK first.
The takeaway point is that, when designing iOS applications for deep linking, always make sure that scenes can be instantiated on their own and that each has proper error handling. Also, utilizing the concept of routers from web applications can make our lives a lot easier as we design our application.