If you are a Branch customer using Adobe Analytics, you probably know about our integration that allows you to forward Branch tracking events directly to your Adobe dashboard.
Sending Branch events to Adobe Analytics is a great way to keep Adobe as your main source of truth for data analysis. You will also benefit from getting insights into how app users were acquired and other key data that Branch appends to your downstream events.
This blog post will provide you with step-by-step instructions to set up the Branch Integration with Adobe Analytics. For more information on what events you should track using Branch, we recommend exploring this blog.
Check to ensure you have the prerequisites
Before you begin the integration process, ensure you have an app set up with the following:
- The latest Branch SDK
- Adobe’s Mobile Core SDK (including the Analytics and Identity extensions)
- Access to Branch’s Data Feeds
If you meet these prerequisites, skip down to learn how to enable the Adobe integration. If you aren’t yet up and running with Adobe Analytics, here are the bare-bones steps to add in their SDK and complete the prerequisite steps:
- First, open the app level build.gradle file. Add the following two lines as dependencies. These will import Adobe’s Core SDK and Analytics plugin respectively.
dependencies {
    …
    implementation 'com.adobe.marketing.mobile:sdk-core:1.+'

    implementation 'com.adobe.marketing.mobile:analytics:1.+'
        …
}
2. Next, open your Application class. At the top of the code, import Analytics, Identity, and MobileCore from com.adobe.marketing.mobile.
import com.adobe.marketing.mobile.Analytics

import com.adobe.marketing.mobile.Identity

import com.adobe.marketing.mobile.MobileCore
3. Inside of the onCreate() function, initialize the Mobile Core component and register the Analytics and Identity extensions. Here is the full code:
override fun onCreate() {

super.onCreate()

MobileCore.setApplication(this)

MobileCore.configureWithAppID("<app-id>");

try {

Analytics.registerExtension()

Identity.registerExtension()

MobileCore.start(null)

} catch (e: Exception) {

Log.e("Debug", e.toString())

}

Branch.enableLogging()

Branch.getAutoInstance(this)

}
Let’s break down the code to understand the impact of each section.
MobileCore.setApplication(this)

MobileCore.configureWithAppID("<app-id>");
These lines set the MobileCore application to this using the setApplication() function. Then, you utilize the configureWithAppID function and pass in the app ID.
Note: You also have the option of performing this configuration with a file. Please refer to Adobe’s documentation on the Configuration API for more information.
try {

Analytics.registerExtension()

Identity.registerExtension()

MobileCore.start(null)

} catch (e: Exception) {

Log.e("Debug", e.toString())

}
Next, register the Analytics and Identity extensions and then start the MobileCore SDK. I recommend wrapping these lines of code inside of a try-catch block. This way, if an exception is thrown, your application gracefully handles it and doesn’t crash.
Branch.enableLogging()

Branch.getAutoInstance(this)
The final two lines are pertinent to the Branch SDK integration. They handle enabling debug logging and initializing the Branch singleton instance. At this point the Adobe Mobile Core SDK is set up in your app, along with the Analytics and Identity extensions.
Now that the prerequisite steps are complete, you can begin setting up the configuration to send Branch events to Adobe.
Enable the Adobe integration in the Branch Dashboard
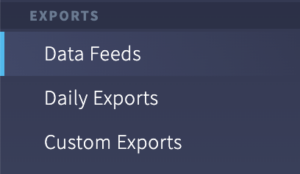
The next step is to navigate to your Branch Dashboard and enable the Adobe Data Analytics Integration. To do this, select Data Feeds (the first option under Exports on the left sidebar of the Branch Dashboard.
Then select the Data Integrations tab.

Search the list of partners for Adobe Analytics (Processing Rules).
Note: The Data Connector integration is a legacy integration and should not be selected.

Enter the requested credentials. Details of where to find these can be found in this documentation.
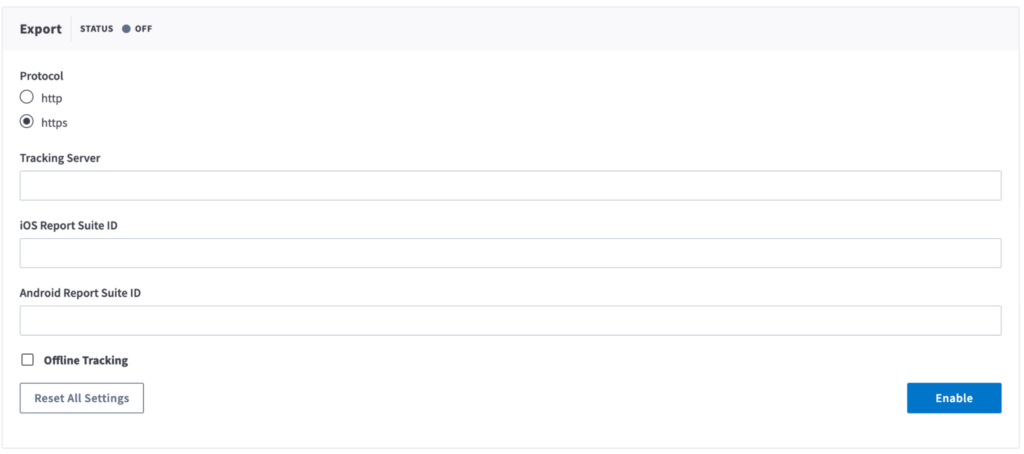
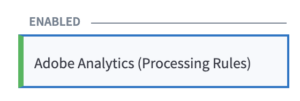
Enter the protocol, tracking server, and report suite ID (Android/iOS). Then toggle offline tracking (if applicable) and choose the Enable button to activate the integration. Once you do that, Adobe Analytics (Processing Rules) should move to the enabled section of the Partners field and have a green highlight to the left of it.
Congratulations! This completes the Branch dashboard configuration. The next step will involve making code changes to the app.
Make the necessary changes to the app code
Next, open up the .kt or .java file for the activity you have set up to handle Branch routing. This is the activity you added to the intent-filters when initially setting up the Branch SDK.
At the top of the code, import AdobeCallbackWithError, AdobeError, and Identity from com.adobe.marketing.mobile. You will need these classes in this file.
import com.adobe.marketing.mobile.AdobeCallbackWithError

import com.adobe.marketing.mobile.AdobeError

import com.adobe.marketing.mobile.Identity
Inside of the onStart() lifecycle method, complete these three steps:
- Delay the initialization of the Branch SDK
- Retrieve the Experience Cloud ID (ECID)
- Initialize the Branch SDK once you have the ECID
1. Delay the initialization of the Branch SDK by calling the expectDelayedSessionInitialization() function.
Branch.expectDelayedSessionInitialization(true)
2. Use the getExperienceCloudId function to retrieve the ECID. You can either supply an AdobeCallback or an AdobeCallbackWithError. I recommend the latter, especially when debugging, so you can get information if an error occurs. The callback gives you two functions, fail and call. Fail() will be called if an error occurs. Call() will be called if the ID was successfully retrieved. Pro tip: Cache the Adobe ID value in a variable and use that value for subsequent opens for the best UX (code example).
Identity.getExperienceCloudId(object : AdobeCallbackWithError<String?> {

override fun fail(error: AdobeError) {
}
override fun call(id: String?) {
}
})
3. Output a message with the relevant error inside of the fail function for debugging purposes.
override fun fail(error: AdobeError) {if (error === AdobeError.UNEXPECTED_ERROR) {
Log.e("Debug", "UNEXPECTED_ERROR")
} else if (error === AdobeError.CALLBACK_TIMEOUT) {
Log.e("Debug", "CALLBACK_TIMEOUT")
} else if (error === AdobeError.CALLBACK_NULL) {
Log.e("Debug", "CALLBACK_NULL")
} else if (error === AdobeError.EXTENSION_NOT_INITIALIZED) {
Log.e("Debug", "EXTENSION_NOT_INITIALIZED")
}
}
4. Add some code inside of the call() function. In order for Adobe to ingest the events that Branch forwards to it, those events need to have the ECID added to them as custom data. For this, you can use the setRequestMetadata function and pass in the key $marketing_cloud_visitor_id as the first argument, and the ECID as the second argument.
override fun call(id: String?) {

Branch.getInstance().setRequestMetadata("$marketing_cloud_visitor_id", id!!)

}
Important: Be sure to call setRequestMetadata before the Branch SDK is initialized!
After that, you can move the call for initializing the Branch SDK underneath the line of code you just wrote. This way the Branch SDK is always initialized after the ECID is set as metadata.
override fun call(id: String?) {

Branch.getInstance().setRequestMetadata("$marketing_cloud_visitor_id", id!!)

Branch.sessionBuilder(this@MainActivity).withCallback { branchUniversalObject,

linkProperties, error ->

if (error != null) {

Log.e("BranchSDK_Tester", "branch init failed. Caused by -" + error.message)

} else {

Log.e("BranchSDK_Tester", "branch init complete!")

}}.withData([email protected]).init()
}
5. Make sure you are logging event(s) through Branch that can be sent to Adobe. By default, Branch will send referred opens and installs (opens and installs that resulted from a click on a Branch link) as well as any Commerce or Custom events you track to Adobe. In this sample app, a few buttons track Add to Cart, Purchase, or a Custom Event on click.
addToCartButton.setOnClickListener {

BranchEvent(BRANCH_STANDARD_EVENT.ADD_TO_CART).logEvent(applicationContext)

}

customEventButton.setOnClickListener {

BranchEvent("Custom Event").logEvent(applicationContext)

}

purchaseButton.setOnClickListener {

BranchEvent(BRANCH_STANDARD_EVENT.PURCHASE).logEvent(applicationContext)

}
Test in the Branch Dashboard
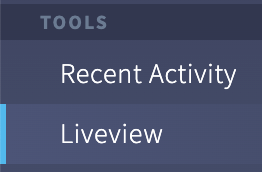
Now jump to the Branch Dashboard and utilize Liveview to make sure the events are firing, getting tagged properly with the ECID, and successfully reaching Adobe.
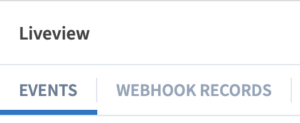
On the left sidebar, all the way at the bottom, is the Liveview option. There are two areas in Liveview which you’ll need to work with for this part of the setup.
- Events
- Webhooks
Events tab
Let’s focus on the Events tab first. You should see this tab by default in the Liveview section.
You’ll need to set the filter to an event that Adobe Analytics will accept from Branch.
Note: Branch will only forward referred (driven from a Branch link click) opens, installs, and reinstalls, as well as any commerce and custom events you track via Branch.
For example, use the drop down and set the value to custom event.
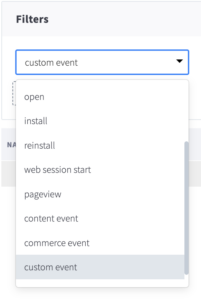
Then select the Update Session button. Liveview will begin listening for custom events.
Next, you need to actually trigger one or more custom events in our app so Liveview can pick up those events. In this example, we’ve used a basic sample app that includes Add To Cart, Purchase, and Custom Event buttons that will trigger commerce events when clicked.

After triggering the custom event, wait a few minutes until a Load New Events button appears, highlighted in a light blue color. Selecting this button will load the new events you have triggered in the app in Liveview where you will be able to inspect them in near-real time.

Now you can select the square in the top right to reveal the Add/Remove Columns dropdown menu. You can toggle the checkboxes next to any of the fields to add that column and uncheck the box to remove a column.
Make sure to add the custom data column to the view to ensure that the Marketing Cloud Visitor ID (i.e. Experience Cloud ID) is getting properly appended to events. Without this ID, Adobe will not ingest events from Branch.
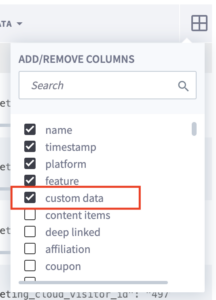
You should now see a field in the custom data that shows $marketing_cloud_visitor_id along with a value. If you see this, you have successfully retrieved the ID from the Adobe Analytics SDK in your app and appended it to the events that Branch will be forwarding to Adobe.

Webhooks tab
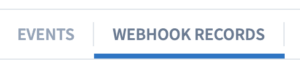
You also need to confirm that the webhook for the event is being successfully received by Adobe. To do this, select the Webhook Records tab in Liveview where you can view if webhooks are getting sent from Branch to server endpoints.
Use the Add Filter button to check if the value of webhook partner key equals di_adobe_analytics_pr. Ensure that the webhooks showing are the only ones getting sent to Adobe.
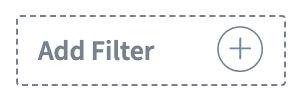

A large number of webhooks could be sent from the app at any time, and Liveview will conduct sampling. Because of this, it is always best to apply filters as much as possible to accurately see the desired webhooks.
To apply these changes, select the Update Session button.
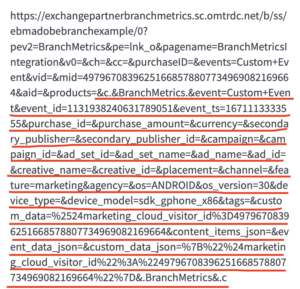
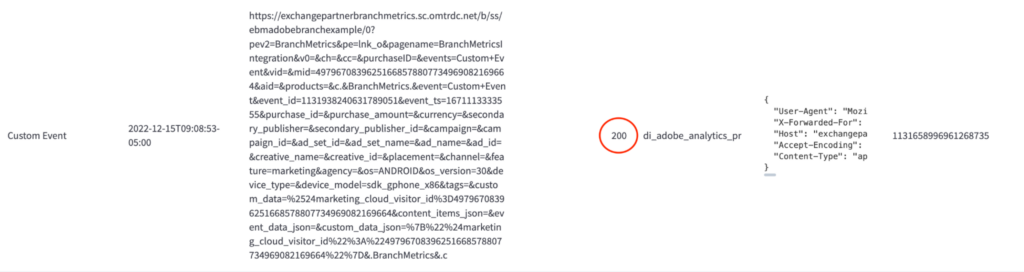
Now you should begin to see the webhook records coming through. Let’s take review some of the key information on these webhook records to better understand the process by which Branch is sending these events to Adobe.

The context data is the main piece of information contained in this webhook record. It’s also the part that gets sent to Adobe to be captured by the processing rules. The context data can be seen in the webhook payload starting with &c. and ending with &.c. This data is used to populate eVars (aka Context Variables) via processing rules in Adobe.
The webhook response code will indicate whether the event was successfully sent to Adobe. A code of 200 means the event was correctly sent.
You have now successfully leveraged Branch’s Liveview to validate that the events are being properly sent to Adobe Analytics.
Set up processing rules in the Adobe Analytics Dashboard
Once you have the events tagged with the ECID and firing via the Branch SDK, you can log into the Adobe Analytics dashboard to perform the next step: configuring the processing rules.
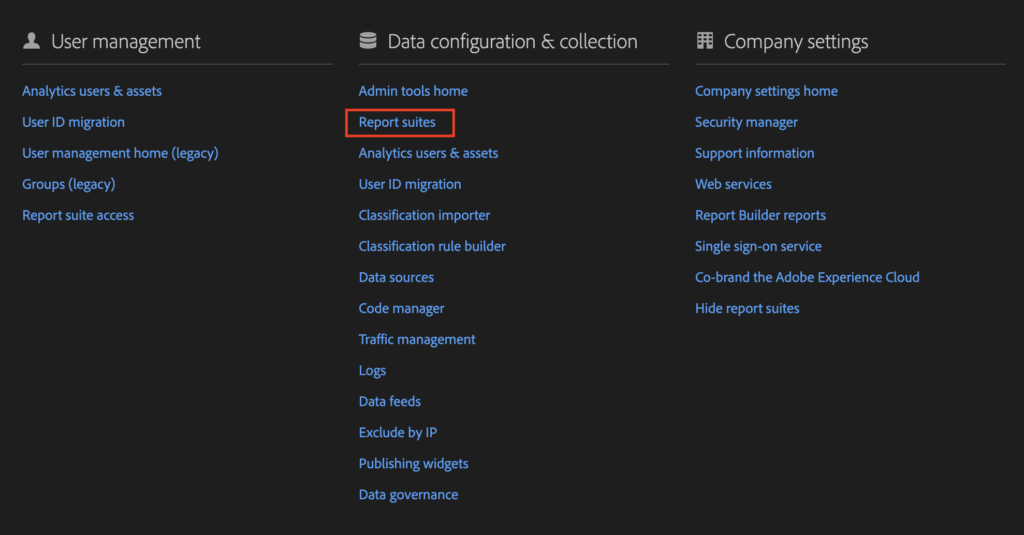
On the quick access pane, select Analytics.

From there, select Admin → All admin.

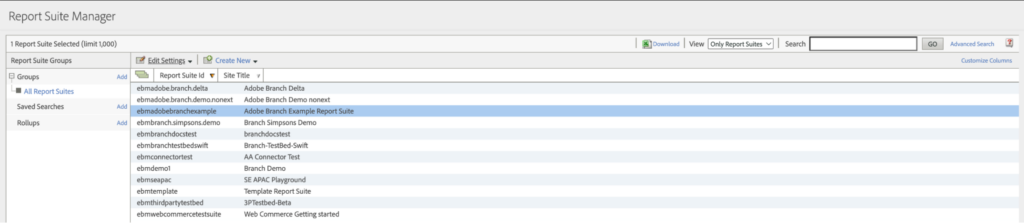
Under the Data configuration & collection section you’ll find a report suites option; select it. Now you’ll be taken to a view of the various report suites you have configured in Adobe.
Select the report suite you want to edit.
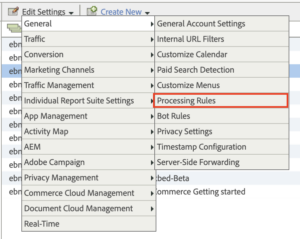
Then go to Edit Settings → General → Processing Rules.
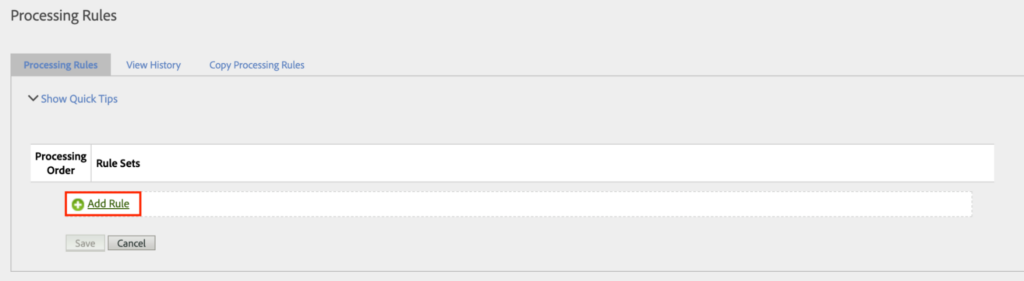
To add a new processing rule, select the Add Rule button.
Give your rule a title in the Rule Title input field. In this case, I’ve specified the title to be Branch Event Rule.
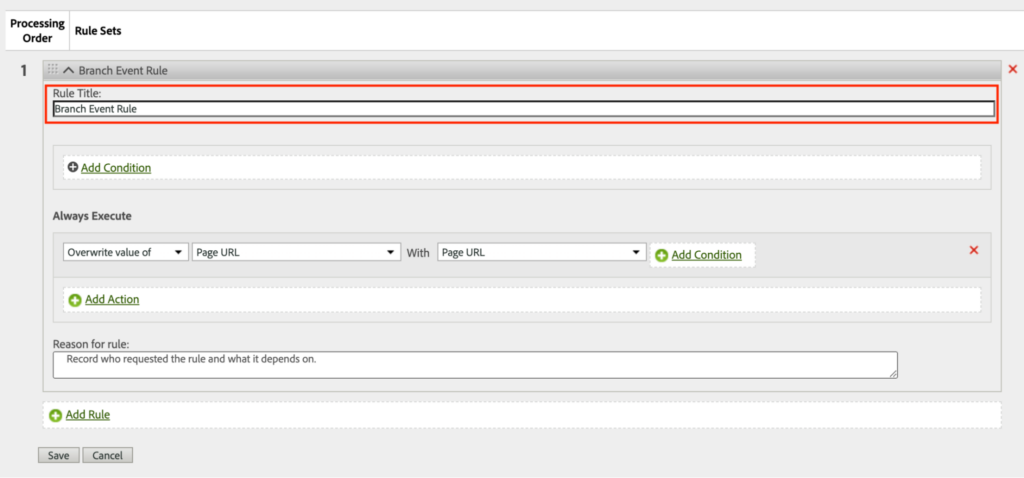
Next, add a condition for the Processing Rule to take effect, which you can do by selecting the Add Condition button.
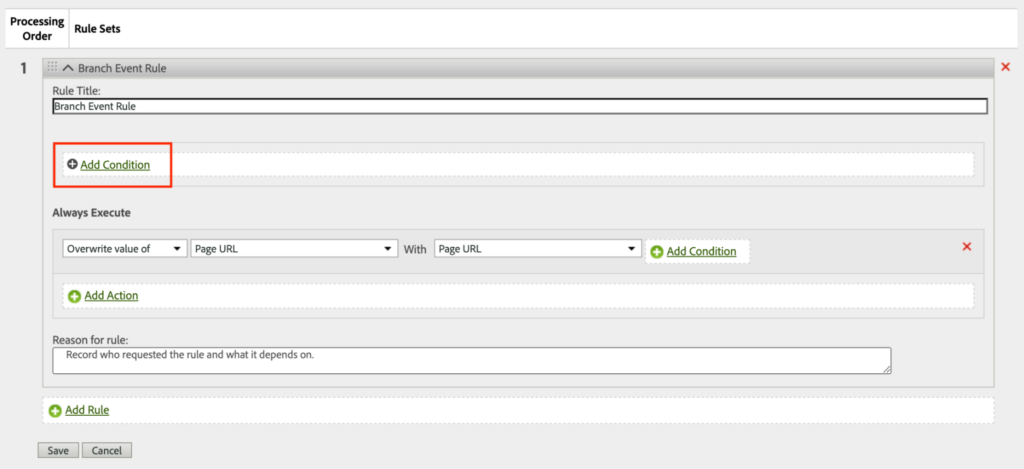
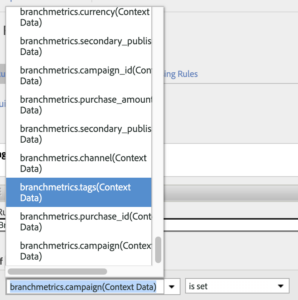
An example of a condition is if the value of branchmetrics.campaign, coming through in the context data, is set. This means this data came from Branch and has specified a certain campaign.

Note: This is just one basic example of a condition. There are many Branch metrics values you can use when setting up the conditions for a processing rule. I encourage you to explore all the options and choose what is best for your app’s data reporting goals and KPIs.
Then comes the actual rule.
In this case, you will specify that the value of your eVar1 variable’s Internal Campaign should be overwritten by the branchmetrics.campaign context data coming in from Branch. The eVar1 variable will capture the events coming in from Branch and replace the default campaign information with the campaign information it receives from Branch.

Don’t forget to choose the Save button to save the processing rule you just created.
Congratulations! Now you should be able to capture Branch data coming into your Adobe Analytics reports. You’ll get insights into how app users were acquired and other key data that Branch appends to your downstream events.
Branch and Adobe help optimize your campaigns
With Branch and Adobe Analytics, you can better optimize customer experiences, improve campaign performance, and create a holistic view of end-to-end customer journeys across mobile, desktop, TV, and offline channels.
Branch can help you make this partnership one that drives growth and engagement for your mobile experience.