
Hey, Sahil here again with Part 2 in an ongoing series getting into the weeds of Branch deep linking. In Part 1 (read Part 1 here if you haven’t yet or if you need a refresher) you learned that a Branch link is a literal web page, which means there is a server component (our back-end) and a client component (our front-end).
In this post you’ll learn how our client and server components are used to accomplish routing, which comes into play whenever a user clicks a link, and will vary based on the information we have about a particular user (ie where they are clicking) and a customizable routing template specific to the app associated with those links.
As a developer using deep linking, you need to cover tons of edge cases in your routing: is the user clicking on iOS or Android? On mobile web or on their desktop? What if they’re clicking inside the Facebook or Twitter app? One of the benefits of using Branch is that we take care of these edge cases for you so you don’t have to think about identifying and solving for each one. This is how we do it.
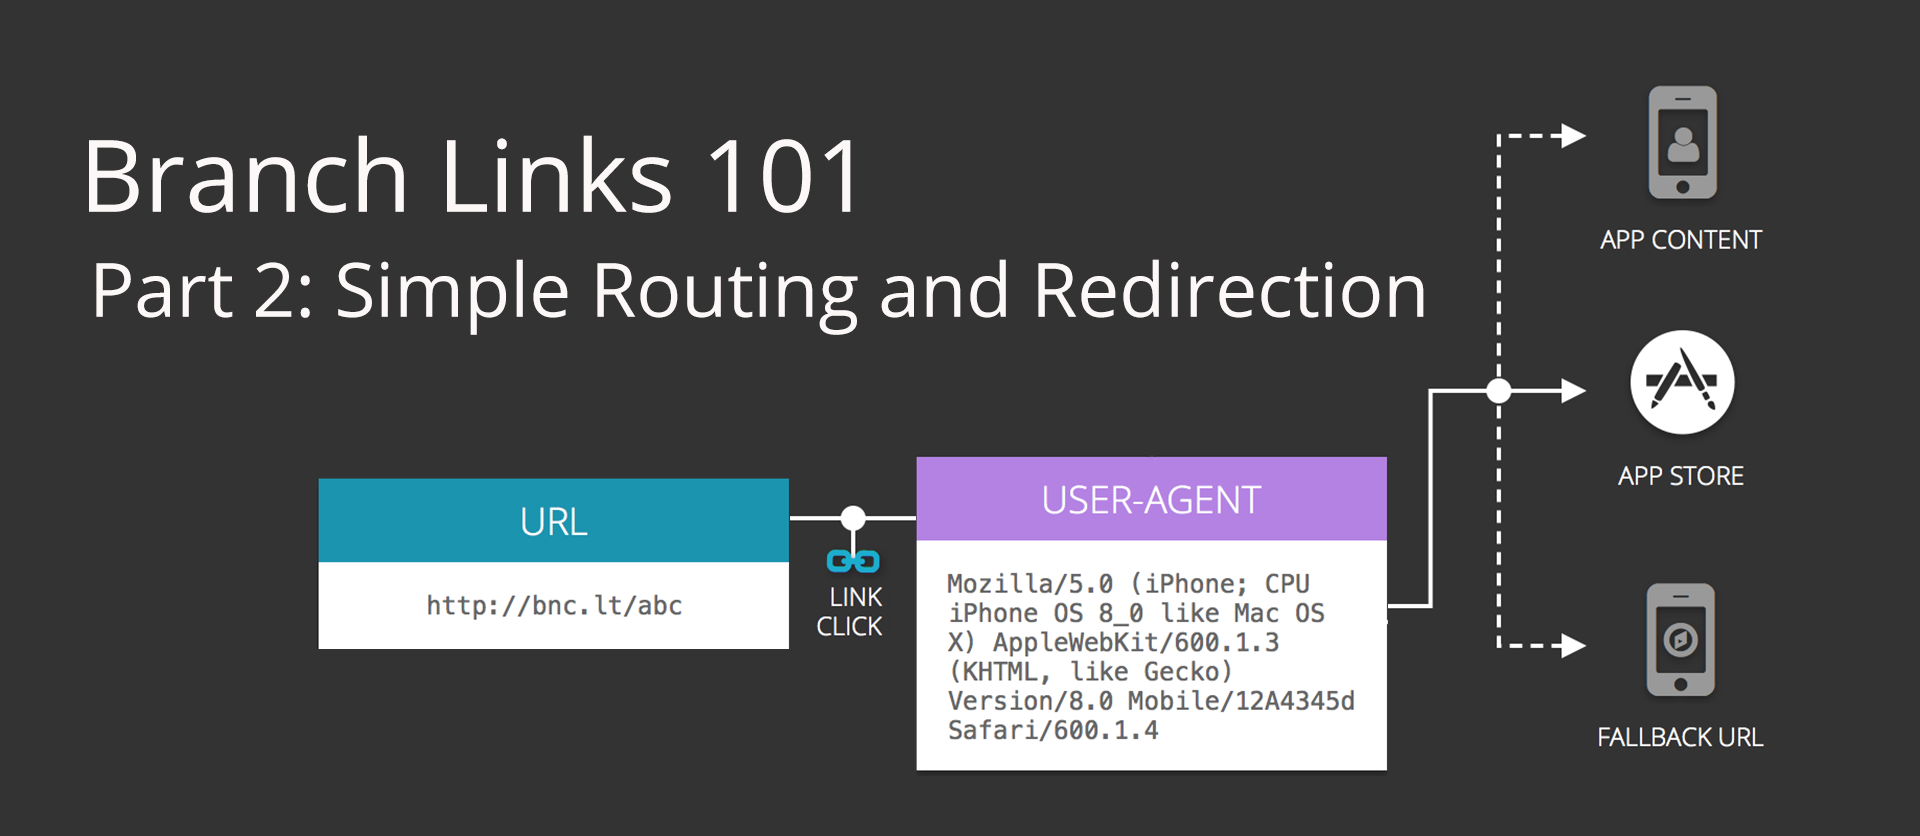
We start with a user-agent that comes to us when a user clicks a link tied to your account:
A user-agent is a string that tells us the platform OS and browser a user is running on. With these two pieces of information, we can standardize a user-agent and put them into the bucket that applies to them, including iOS, Android, Facebook, Twitter, desktop, Blackberry, Windows, the list goes on…
Then we retrieve your app’s preferences for where you want to send users:
This involves your URI schemes and your URL “fallback” preferences. You set these in the dashboard under “Link Settings.” In my last blog post, we discussed how a link ending in “/abc” ties to a unique app attached to your account. So if you’ve created an account with Branch, you’ve told us where your app lives (from the iOS “fallback” URL). When you made a link, you’ve told us where you’d like to route users who have the app installed (from the iOS URI Scheme). When we detect someone clicked your link, our server (back-end) is going to look up these preferences.
Putting user-agent and your saved preferences together:
After looking at the user-agent and placing that user (who is clicking a link with the intent of going into your app) into the appropriate routing bucket, we retrieve the scheme and fallback of the app associated with the link. With these two pieces of information, we populate our routing template to help make the decision of what to do with the pieces of information we have.

Traveling back to the front-end now:
Since a Branch link is a web page, we generate an HTML document and inject some Javascript, since all browsers execute JS. This is configurable and customizable on your end, but our base web template will try to open your scheme while setting a timeout. If the timeout returns it means we can’t open the application in that set time, most likely because it isn’t installed. In this case we turn to the fallback URL, turning window.location to your fallback (either the app store or a custom URL you set).
A little more on configurations and customizations:
As we learned in Branch Links Part 1, every link is configurable to accomplish the unique path you want it to take. Let’s say that on a special link you want to override the default desktop routing with a special routing path. As long as that link has that data saying where you would like to route in that case, (e.g. $desktop URL), when the server returns the overrides, we can pass that along, and the template can react accordingly. You can accomplish these overrides in the Branch dashboard custom redirects section when you are creating a link, or manually by specifying $platform_url when you are creating a link. Either method will override your default global settings.
In Summary:
There are certainly many pieces that come to play when you are adhering to the best practices of routing. For us, the first piece is establishing a library that strictly deciphers what platform is tied to a user agent (your users, the ones clicking links into your app). Then next piece is looking up the saved preferences tied to the URL that you (a Branch user) made, and retrieving any custom routing associated with it (in addition to the default URI scheme and fallback URL). The last piece is generating the template based on these saved preferences with which to complete your user’s routing pathway.
Our system in creating these templates is the best way to take care of every edge case of user agent, while allowing the greatest flexibility for an app to customize on an individual link basis. This post covered a very simplified routing template, which routes the user into your app if they have your app, and takes them to a fallback if they don’t have it yet. In future posts, templates will get way more complicated when we tackle how to handle social platforms on iOS and Android since each platform has their own way they handle deep linking into your app. Another great reason to make use of Branch tools!
Ready to implement your own Branch Links?